
SBI (State Bank of India) is one of the major public sector banks in India providing its services through its more than 24000 branches. It has a huge customer base and hence it gives various online facilities. In this article, you will know how to open an account in SBI Online?
All the processes are online. you do not have to visit the branch. moreover using the details you can activate your SBI net banking as well.
How to Open SBI Account Online Step by Step
Follow the steps below in order to open an SBI bank account online. make sure do not to skip any steps till you finish the process. So sit at home and start the SBI account opening process…
- Download and install YONO SBI to your mobile phone.
- Open this app and click on Allow button to give permission to YONO SBI App.
- Now click on New to SBI tab on the bottom part.
- Click on Open Savings Account. Once. once you click on Open Savings Account you will see two options i.e. Digital Savings Account and Insta Savings Account. if you select a Digital saving account you need to visit a branch once for KYC verification but for Insta Savings account no need to visit the branch. Click on Apply Now button for Insta Savings Account.
- On the next page click on Apply New. Read Product Information, check the declaration box, and click on the Next button.
- Now Enter your Mobile number and click on Submit button. an OTP will be sent to your entered mobile number. Enter that OTP and click on Submit button.
- Create your application password, Re-enter the application password. Select a Security question and provide an answer to that. Click on the Next button. Password should be of a minimum of 8 characters with a combination of letters in Upper and lower case, digits, and special characters.
- Now You will see a message on the screen saying complete the application within 15 days of start otherwise entered data will be lost. Click on the Ok button. on the next page check the CRS declaration box and click on the Next button.
- Now under the personal details tab check the box I agree to the above and click on the Next button.
- Click on Enter Aadhaar number option and enter your Aadhaar Card number in the next window and click on Submit button.
- Once you click on the submit button you will receive an OTP to the mobile number registered with your Aadhaar. enter the OTP you received and click on the Next button.
- Once your Aadhaar is verified through OTP, you will see your personal details on the next window. Click on the Next button.
- Enter your City/Palace of birth, Country of birth, Citizenship, Nationality and click on the Next button.
- Now you will see all your details like your address, PIN Code, State, etc. on the next window. if you want you can select Sub-district, Village/Town from the dropdown. Click on the Next button.
- On the next window Enter your PAN Card Number and click on the Next button. once you click on the next button App will fetch your photo from Aadhaar and you will see your photo on the screen. Click on the Next button.
- Now Under Additional details select your Educational Qualification, Marital Status, enter your Father’s Name, Mother’s Name and click on the Next button.
- select your Annual Income, Occupation, Occupation Service (private, Public, government sector), Religion, from the given options.
- Now click on enter Nominee Details, Fill in the Nominee details like name, relationship, DOB, etc. and click on the Next button. if the Nominee address is the same as yours check the box Nominee address same as Applicant address otherwise enter the address. Click on the Next button.
- On the next window select your Home Branch by clicking on the By Locality button, click on the Next button, select your Home Branch from the Dropdown. just type the name of the branch and it will appear on the screen. Click on the branch name to select and then click on the Next button.
- Read Terms and conditions, check the box I have read and agreed to the terms & conditions then click on the Next button.
- You will receive an OTP to your entered mobile number, enter that OTP and click on the Next button.
- On the next screen enter the name you want to print on your Debit Card and click on the Next button.
- Your account has been created successfully and you will see all your details like Account Type, Account Number, CIF Number, Branch Code on your screen. you will also receive a temporary User ID to activate SBI Net banking.
- You can use this User ID to activate SBI Internet banking. follow the process below to activate your net banking.
Congrats!! you have successfully opened your new account online in SBI without visiting the Bank.
NOTE: You need to upgrade your account to a Full KYC account by visiting your branch within One year otherwise the account will be closed.
How to Activate SBI Net Banking If I have Opened SBI Account Online
If you have opened an SBI Insta Saving account online and you have got a temporary user ID from the bank follow the below process to register for SBI net banking.
Keep your PAN Card, Aadhaar Card with you.
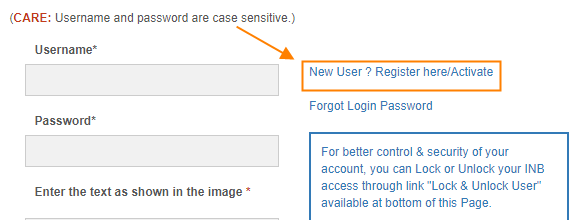
- Visit SBI Internet banking official Website.
- Click on the link New User? Register here/Activate. you will see one notification from SBI on the top. Click on the Ok button.
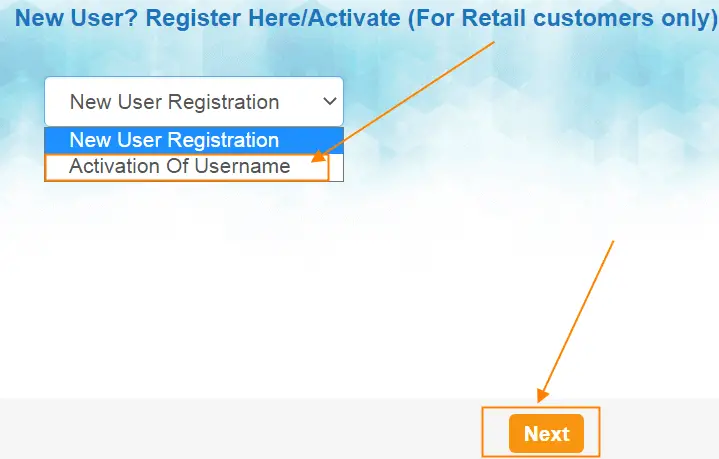
- On the next page select Activation of Username from the drop-down and click on the Next button.
- Enter Temporary Username you received from the bank through an SMS, CIF Number (you got it after you finished opening SBI account online), DOB, the text shown in the image, and click on Submit button.

- An OTP will be sent to your registered mobile number. Enter the OTP and click on the Confirm Button.
- Now Enter Username, New Login Password, Confirm Login Password, and click on Submit button. your user name can be up to a maximum of 20 characters and a combination of alphabets and numbers. Password should be of a minimum of 8 characters with a combination of letters in Upper and lower case, digits, and special characters.
- On the next screen, you will see a message a confirmation message that you are successfully registered for internet banking.
- Click on Close button and login to SBI Net banking.
Conclusion
You have learned how to open an account in SBI step by step. I hope this will help you to open a new account in SBI very easily.
If there are any doubt//questions regarding this information you can ask in the below comment section. I will be happy to answer them.