
The cheque is a printed form that is used for the transaction of money from one account to another. sometimes we make mistakes while filling the cheque and because of this, it becomes invalid. In this post, we will learn how to fill a cheque correctly.
In India still, a major population uses cheques as a means to transfer money from his/her account to another account.
Hence, it is very important that one should not make mistakes while filling it. In this article you will learn how to fill SBI Cheque Book.
Before proceeding to the process of filling a cheque let’s see first the main components of any cheque. Check the below image to understand.
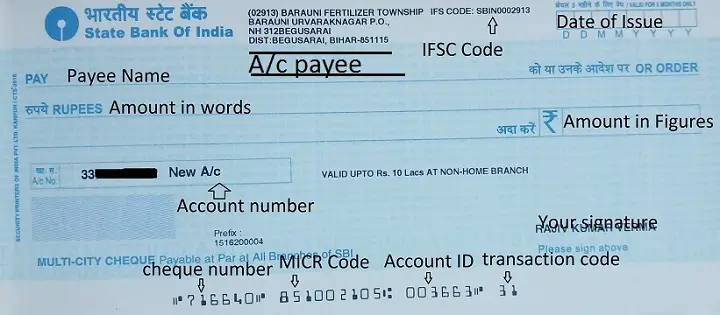
Components of Cheque
There are a few main components of cheques mentioned below which everyone should aware of in order to avoid any confusion. Above image is of SBI Cheque Book.
- IFSC Code: This code you will able to find on top of any cheque. It stands for Indian Financial System Code. IFSC code is unique for every branch which helps to transfer money in a smooth way.
- Account Number: It will be present in the middle of the cheque. It’s your personal account number.
- Cheque Number: In the bottom you can see the first 6 digit. It is your cheque number
- MICR Code: After the cheque number MICR Code comes at the bottom of the cheque. It stands for Magnetic Ink Character Recognition. MICR Code helps banks to process cheques quickly through a sorting machine.
- Account ID: After MICR Code we have an Account ID which is not that important though it shows your bank account details. This ID is registered with RBI.
- Transaction Code: In the end or after Account ID there is a transactions code that helps the machine to identify whether it’s a local cheque or a payable cheque. A local cheque can only be deposited in your home branch, later can be deposited at any branch.
Now that you have understood the components of the cheque. let’s move to the process of filling the SBI cheque step by step.
| Read Also How to Fill SBI KYC Form |
How to fill SBI Cheque Book
You can follow the steps below in order to fill the SBI Cheque Book.
1-Date:
The first step while filling any cheque is to fill in a date. generally, we put always today’s date.
It’s not mandatory to fill always today’s date.
It depends on your requirement like If you are issuing a cheque to someone and you want the cheque to encash a week later you can put the date one week after.
The person can encash the cheque only on the day or later mention on the cheque not before.
2-Name:
The next important field in the cheque is a name that is present as the PAY section on the cheque. fill the payee name i.e. to whom you want to encash the cheque.
Write “Self” next to pay in the cheque if you are withdrawing money from your account
Strikeout “bearer” in case if you want the cheque to encash only by the person whose name is written on it.
3-Amount:
Next, write the cash amount which you want to withdraw or transfer in “words” where it says Rupees in the cheque.
Write the cash amount in “figures” in the box.
4-Account Payee crossed:
If you want the cheque to be crossed draw two parallel lines on the top left and write “A/c Payee” as mentioned above in the image.
5-Signature:
The last thing you need to do is to sign the cheque before depositing it to the bank.
Because of security reason , you should also signs on the backside of your cheque so that there is no problem
That’s all and you are done with filling your cheque.
Also Read Types of Cheques
Important Points to be Note down While Filling any Cheque
There are few points which you should not avoid in order to have a safe transaction through a cheque. below are a few of them.
- Try not to issue a bearer cheque, if you lost it anyone can encash it. Cancel the word bearer if you want the person mentioned on the cheque to encash it.
- After writing the Payee name and amount make sure you draw a line or slash (/-) in order to make sure no one can write anything after you have written.
- Do not overwrite the cheque otherwise, it will be canceled.
- Always write ‘ONLY’ at the end of writing the Amount in Words in the ‘RUPEES’ column.
- Do not SIGN on the bottom part of your cheque.